


QualiWare Go Support
QEF setup
QEF setup
QualiWare Go setup in QEF console
1. You need your Azure Client ID and Azure Tenant ID.
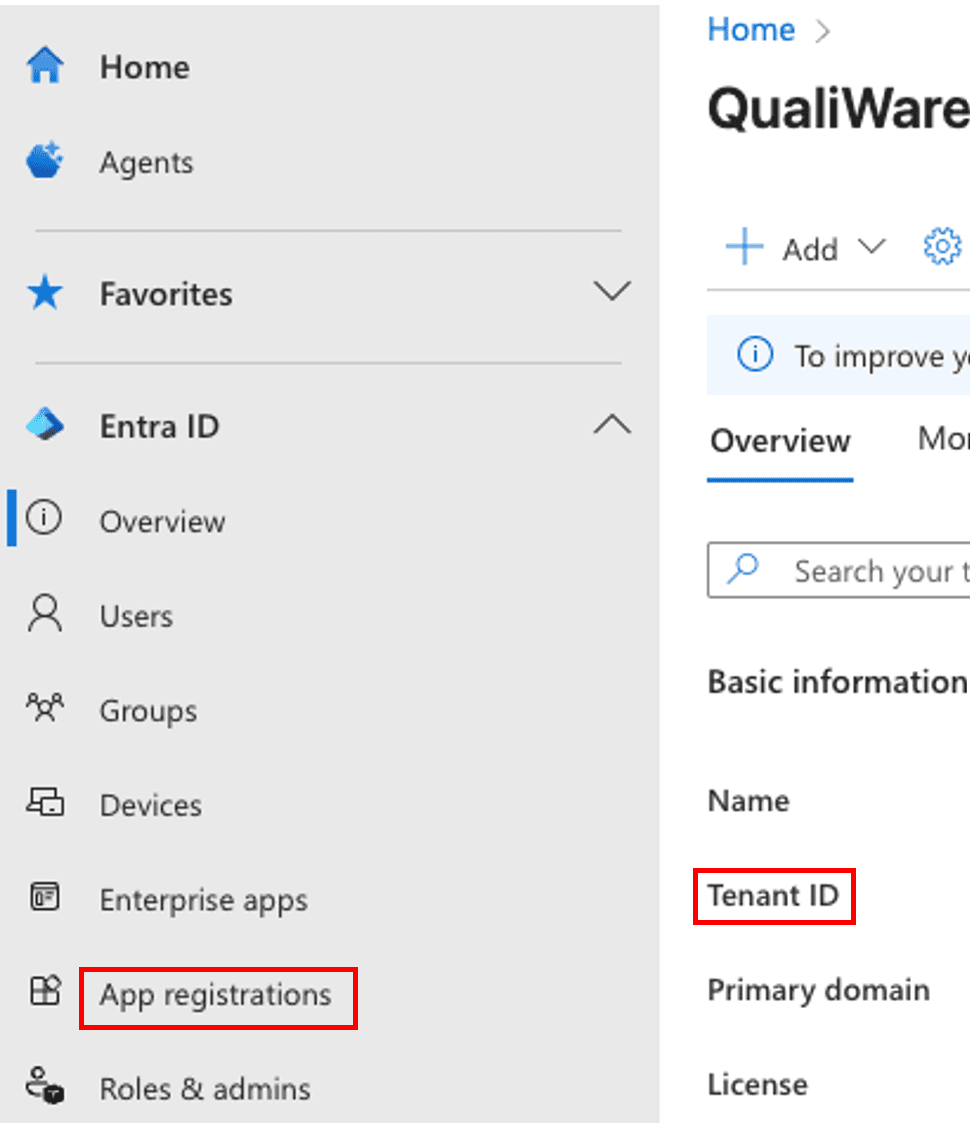
- Go to https://portal.azure.com.
- Navigate to Active Directory
In Overview, find your Tenant ID.
- Go to app registrations.
Locate the app registration used for your QualiWare login.
Find your Azure Client ID.
- For the first-time Azure login setup, go to: https://coe.qualiware.com/wp-content/uploads/2021/12/Azure-AD-Synchronization-Application-Setup.pdf
2. App redirect URL
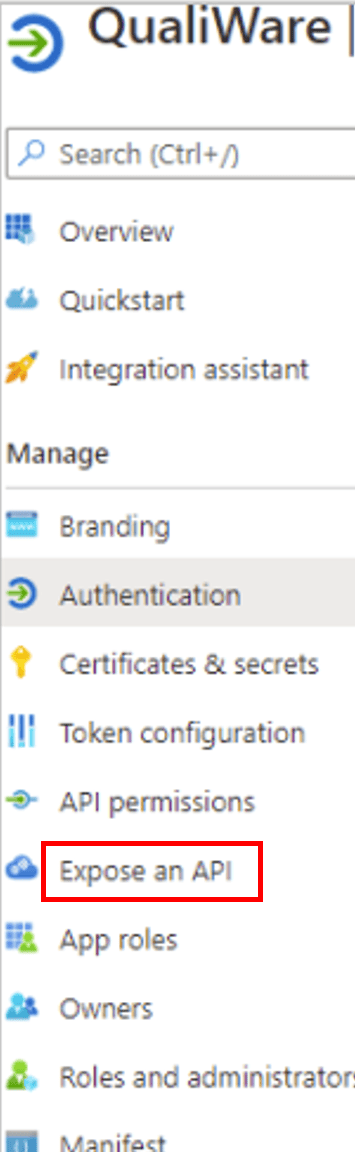
Under same app registration:
- Go to “Authentication”.
- Find “Mobile and desktop applications”
- Add “com.qualiware.ar://auth” as a redirect URL

3. Azure sign in scope
Under same app registration:
- Click Expose an API.
- Add a “signin” scope if it doesn’t already exist. Should look like “api://Client ID/signin”.
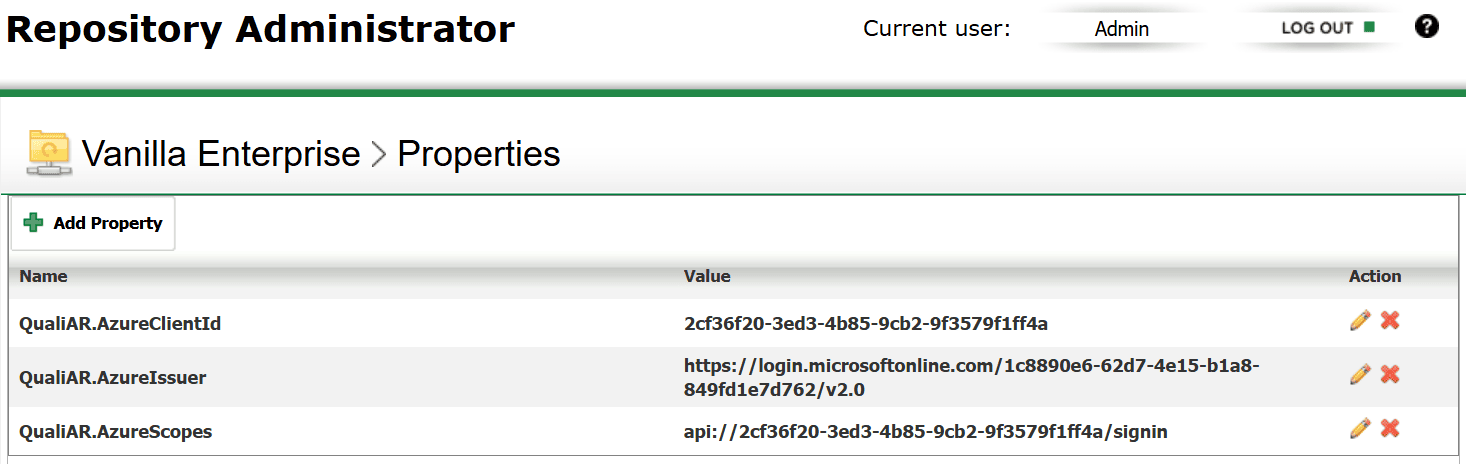
4. Open the Repository Administrator of your QualiWare instance
Go to Properties
Insert the following (please use copy/paste to ensure correct naming):
- QualiAR.AzureClientId Your Azure client id
- QualiAR.AzureIssuer: https://login.microsoftonline.com/123456789/v2.0
- QualiAR.AzureScopes: api://123456789/signin
Metamodel: Target Asset Identifier and Asset Object List
- A Target Asset Identifier represents a real-world object that the app can recognize using the camera. Examples include QR codes or images of the object.
- An Asset Object List can contain content relevant to the Target Asset Identifier.
- A Target Asset Identifier and Asset Object Lists create a hierarchical structure.
Creating a Target Asset Identifier:
- For best AR results, attach a QR code to your Target Asset Identifier under “Pictures”.
- For best results with image recognition, use clear, high-resolution images with good lighting, minimal background noise, and distinct, well-centered subjects.
- Under Relevant Content: Add Asset Object Lists.
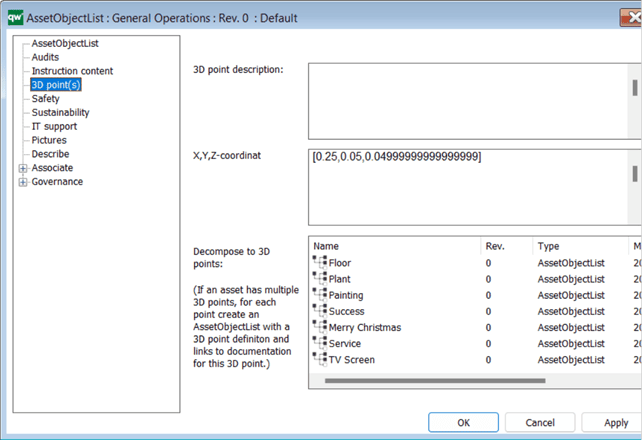
Building Asset Object Lists:
Asset Object Lists store content under:
- Supply Chain for QualiWare diagrams.
- Instruction Content with External Documents.
- Decompose to 3D points with other Asset Object Lists.
- Safety with the template Safety Aspects.
- Sustainability for certain diagram types.
- IT Supports for certain diagram types.
- Pictures in External Documents.
- Content examples: text, links to external sites, videos, images, PDFs, diagrams in your QualiWare repository.
An Asset Object List can work as an AR point.
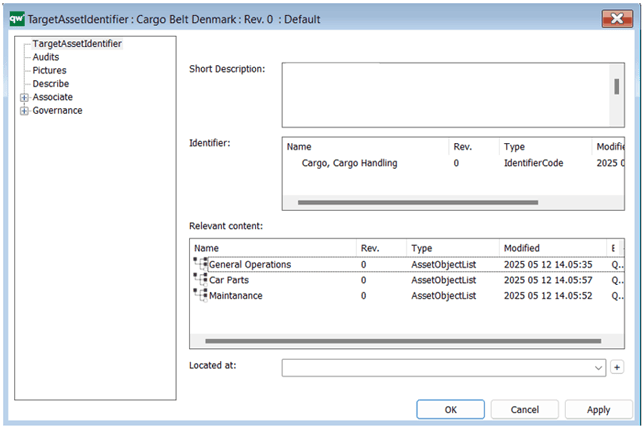
Target Asset Identifier and Asset Object List: Car example.
Orange: Target Asset Identifier with a QR code for the car.
Blue: Asset Object Lists.

5. Target Asset Identifier
6. Asset Object List

7. Asset Object List AR points
An AR point is an Asset Object List under the field “Decomposes to 3D point”.
8. Spreadsheet
Access a spreadsheet view of your Target Asset Identifiers and Asset Object Lists here:

First TimeApp setup
First TimeApp setup
First-Time User Setup
Download and Get Started with QualiWare Go.
1. Download QualiWare Go from:
- Play Store (Android) on https://play.google.com/store/apps/details?id=com.qualiware.ar
- App Store (iOS) on https://apps.apple.com/dk/app/qualiwarego/id6738351278
2. Configure the app:
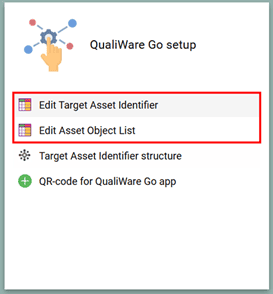
- In your QualiWare repository Asset Management desktop, open the QualiWare Go install wizard in the QualiWare Go setup tile.
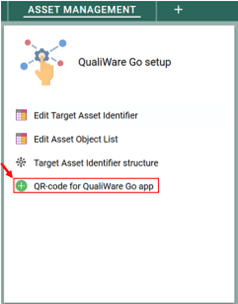
- Open the install wizard, go to “Setup”
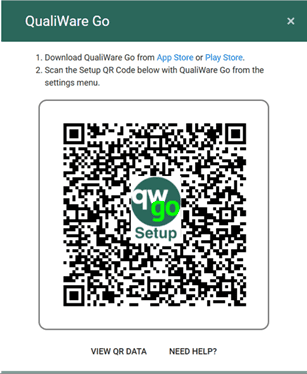
- In the QualiWare Go app, tap the Settings icon ⚙️ in the top-right corner.
Press “Scan QR Code” and scan the Setup QR code.
Press “Save”.
You should now be able to log in.
Alternatively:
- Click “View QR Data” in the QualiWare Go install wizard.
- Click the copy icon to copy the configuration data to your clipboard.
- Send the content from the clipboard to your phone.
- Copy the content to your phone’s clipboard.
- In QualiWare Go “Settings”, tap “Read Clipboard” to import the configuration.
Note: Ensure that the content from your PC’s clipboard is not altered in any way when passing it to the phone.
Using the App
1. Login Methods
QualiWare Go supports two methods for signing in:
- Azure AD
- Username & Password
We strongly recommend using Azure AD (Microsoft 365) login. This method leverages your organization’s identity and access management setup and results in a smoother, more secure sign-in experience.
If you select the username & password option, please check with your IT team or manager in advance. Note that this method may require access via a VPN or other secure network setup and may incur additional configuration or access constraints.
2. Accessing Information:
- Upon logging in, the app retrieves all Target Asset Identifiers in your QualiWare repository.
- Use the app to scan QR codes, or objects, registered in your Target Asset Identifiers.
- When an object is found, the QualiWare Go logo will appear. Press it to open the main menu of the respective Target Asset Identifier.

AR points around the found Target Asset Identifier work as sub-menu entry points.
3. Interacting with the menu and AR points:
- Display PDFs, videos, or other content.
- View interactive diagrams.
- Read texts.
- Open links to external sites (e.g., YouTube or QualiWare).
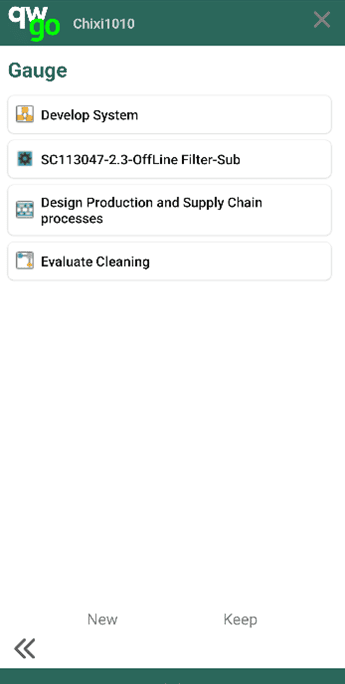
- Click “Keep” to save the menu for later.
4. Architect and Plus licensed users:
- Can create new Target Asset Identifiers.
- Can create new AR points (Asset Object Lists), rename or reposition existing ones, and choose between word or icon-based AR points.
- Can create Change Requests
5. Features for Enhanced Usability:
Lock Marker: A lock icon at the top of the menu can be toggled to stabilize tracking when the app identifies a Target Asset Identifier.
6. Settings Menu:
Accessible via the burger icon in the upper-left corner, providing options to:
- Refresh the app.
- Search through Target Asset Identifiers. The search function uses the names and identifier words of Target Asset Identifiers.
- View saved menus.
- Create new Target Asset Identifiers (Architect licensed and Plus users).
- View user configurations (Settings).
- Log out.
